Sunday, July 24, 2011

The furry tail!!!


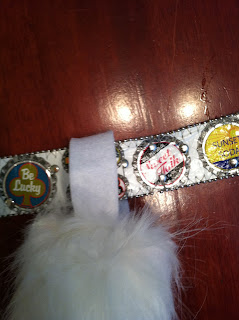
My stepdaughter Elizabeth is a very talented artist and loves to create drawings, sculptures and recently a costume. She specifically loves wolves!! So, to complete her costume she needed a furry wolf tail. She created the pattern herself and cut the fabric herself but wasn't sure about the sewing. I myself wasn't so sure since I have never sewn any faux fur. I turned the tail pieces so that fur was facing fur and sewed up my edges first. I apologize for the lack of pictures during the process this time!! Once I had my edges and bottom sewn up we turned it right side out and Elizabeth stuffed the tail. She wanted to be able to put it on any belt she wanted so I made a small loop out of white felt and sewed this into the tail when I closed it up. The following picture is a close up of the loop on the belt.

So whether you want to make your own tail for a halloween costume or you just like to wear tails this is a cute project!! Happy crafting!!


Saturday, July 23, 2011

No Sew Saturday!!!


So today I wanted to work on something that would allow me to use up a tshirt that my mom was throwing away, it had a lot of pilling so I wanted to make something where you wouldnt really notice this. I have seen tons of website tutorials for necklaces made from tshirts cut into strips so I felt like this might be a good project to try it out on. The first thing that I did was lay my shirt out on my cutting mat and using my rotary cutter cut off the hem and than cut twelve to thirteen 1" strips.


Once I had all of my strips cut up I began to stretch each loop. Once they are stretched they curl in on themselves and look like yarns. Once I had all of the stretched I gathered them all together as shown below with my kitten that thinks these are for her to play with!! I saved one to the side so that I could tie them all together.


After all of the loops are gathered together I used my extra strip to tie my loops together. I tied it one time and then began wrapping it tightly around the loops and then tied off the end and tucked it into my strips. The following picture is after I finished the wrapping.


I also decided to make some handrolled flowers and put them on pins so that I could add them to the necklace or leave them off. I cut one more long strip of the same thsirt fabric and than two smaller strips from a black tshirt that I had previously cut up.


Here are some pictures of the finished project!!! Happy Saturday!!!

Wednesday, July 20, 2011

My adventures in sewing....take two.

I decided I wanted to try to make my daughter a little skirt from upcycled material. I have a t-shirt of my husbands that I had already started cutting up that I havent found a use for yet and a shirt that I got at the thrift store a few months ago that I like but it is too low cut for my taster and it was only a couple of dollars so I want to put it to good use. The shirt and the cut up shirt are pictured below.


Cut up shirt
Once I had my materials selected I wanted to find an example to go by as I am not good enough at this whole sewing thing just yet to figure out all by myself. The one I chose to go by is at this link http://sewmuchado.blogspot.com/2010/02/refashion-tutorial-toddler-ruffle-skirt.html

I love ruffles and I think this is adorable!! I may get my pieces cut today and start sewing tommorrow as I need to purchase some green thread and elastic for the wasteband. The blog uses a t shirt for the main skirt but I have enough material in the bottom of the shirt to make my skirt. I am going to make most if not all of my ruffles from the black shirt.

Once I make some progress I will post more pics!! Have a great day!

Tuesday, July 19, 2011

Upcycled Toddler T-shirt Pajama Pants Tutorial


Recently I have decided that I need to learn how to use my sewing machine. I have been doing hand embroidery since I was a child and my grandmother taught me how to cross stitch and hand embroider. I have been trying to come up with projects that are simple to start with and that will not matter much if it doesn't look perfect. I have also been on a kick of using recycled clothing to make new articles of clothing or accessories. I can achieve a few goals by doing this, first is to reuse clothing we are no are longer using and second is I can practice sewing with material that it will not be a big deal if I screw it up.

So, my first project is a pair of 5T pajama pants from a large womens t-shirt that was in the throw away pile. I wish that I had taken a before picture of the t-shirt but for some reason I did not. First thing that I did was lay my shirt out flat on my cutting mat and grabbed a pair of my daughters pajama pants to use as a pattern. I then took the pants and folded them in half as shown. This is what I layed on top of my shirt to trace my pattern. I think I did this the difficult way so I had to cut four leg pieces and seam on outside and inside.


The next picture is what my leg pieces looked like after I had them cut out. I cut them so that the hem at the bottom of the t-shirt was the hem at the bottom of my pants legs. After cutting out all four of my leg pieces I begin pinning them together with the two right side pieces facing each other. I pinned all the way up the long side and up to the crotch cut on the other side as shown below. You will need to do this to both pants legs. Than I was ready to sew!!!
 
I refered to my sewing machine manual to determine what kind of stitch, stitch size and tension that was recommended for a stretchy knit fabric. My sewing machine is a Janome and they recommended that I use the zig zag stitch C with a stitch length of 4 and the tension between 2-5, I chose 4. All of these settings seemed to work just fine for the tshirt material. Once I had all my settings figured out I was ready to sew up the sides of my pants. The next picture is my finished legs, each leg only took about 5 minutes to sew up the two sides.


Now that I had my two legs I was ready to sew the two together!!I began by pinning the two legs together leaving a 1/4" seam allowance and sewed one side than the other. This is what my pants looked like after sewing my legs together.


Now I am was ready for the waistband. I folded in the top 1/4" all the way around and then folded it in again 3/4 of an inch this time and I used a 3/4 elastic waistband. I had some difficulty since this was t-shirt material getting the waistband to stay down even with ironing so I used to some spray starch and then ironed and it worked perfect.

I then used straight pins to mark along where I wanted to sew. I used the zig zag stitch again but I think it would have been better if I had used a straight stitch. In order to sew around the waist I removed the arm from the sewing machine and sewed around leaving a gap at the end to allow for room to put my elastic in place.


In order to determine the length of the elastic I needed I measured my daughter's waist and subtracted 1" from this measurement to allow for stretching. Once I the correct length I attached one end of the waistband to a safety pin and pulled it through the waistband.


Once my elastic was in I took the safety pin off and sewed the two ends together with a zig zag stitch again and then sewed my waistband shut.  I then had a completed pair of upcycled 5T pajama pants from a shirt that was going to be given away!!


Happy crafting!!